Vactrim Light
Overheating in recessed LED downlights can reduce brightness, shorten component life, and create visible discoloration around the trim. In poorly ventilated ceilings, heat may collect above the fitting like trapped air in a closed box. Insulation, dust, excessive wattage, and incompatible dimmers can make the problem worse. Learning how to solve overheating in recessed led downlights requires more than replacing the lamp.
This guide presents ten practical ways to identify and reduce excessive heat. It considers airflow, fixture ratings, driver placement, wiring condition, and ceiling insulation. A reliable inspection begins with switching off the circuit and allowing the fitting to cool completely. Never judge temperature by appearance alone. A warm bezel may be normal, while a hot driver or burnt smell suggests a deeper fault.
Manufacturer instructions remain essential. They define clearance distances, insulation contact rules, maximum wattage, and suitable dimmer types. These details vary between models. A solution that works for one downlight may damage another. That is easy to overlook.
Simple checks can reveal useful clues. Look for yellowed plaster, brittle insulation, flickering light, or repeated tripping. Check whether the downlight is rated for enclosed spaces. Confirm that the driver has enough ventilation and is not buried under insulation. Professional electricians should assess damaged cables, overloaded circuits, and persistent overheating.
No checklist replaces careful diagnosis. Some installations appear correct but still run too hot. The following methods combine practical experience with safety-focused guidance, while recognizing that every ceiling cavity has different conditions.
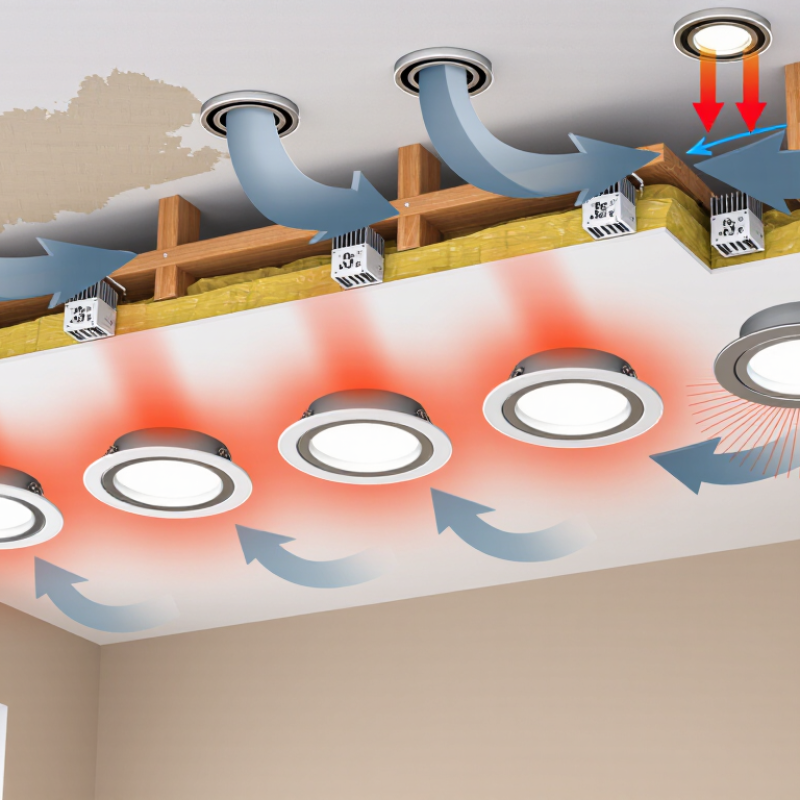
Overheating often begins above the ceiling, where insulation, wiring, or a crowded junction box traps heat. Measure every nearby heat source, not only the visible trim. Record ambient temperature, driver temperature, housing temperature, and insulation clearance during normal operation. A thermal camera can reveal hot spots, but a calibrated thermocouple provides more dependable contact readings. Keep the LED junction temperature below 125°C, using the manufacturer’s test method whenever possible. The junction is not the same as the trim surface. That difference matters.
Tips: Test after several hours, not five minutes. Check the hottest operating condition, including high room temperature and enclosed ceiling spaces. Improve ventilation, remove unnecessary insulation contact, or select a heat sink with greater thermal capacity. Confirm that the driver matches the load and remains within its rated temperature range. Loose connections can also create localized heat, so inspect terminals after switching off power safely.
Field measurements are rarely perfect. Sensor placement, emissivity, and ceiling airflow can distort results. I once trusted a cool-looking bezel and missed a much hotter rear housing. Repeat the test at different dimming levels and document each reading. If temperatures approach 125°C, stop treating the issue as cosmetic. Reduce the thermal load, improve the installation, or replace the fitting with a suitably rated model. A written test record makes later decisions clearer and more defensible.
Overheating in recessed LED downlights often begins with a restricted heat path. A larger aluminum heat sink can spread heat away from the LED board more effectively. Deep, widely spaced fins also improve airflow above the ceiling. Keep the housing clear of insulation, dust, and compressed wiring. Even a small air gap can matter.
Use a thin, continuous thermal interface layer between the LED board and heat sink. Too much paste can trap heat instead of removing it. Tighten fasteners evenly, then check contact marks during inspection. I once found a downlight with a strong heat sink but poor mounting pressure. It looked adequate. It was not. Measure the luminaire case with a calibrated thermocouple after thermal stabilization. Test it in the actual ceiling material, with the intended driver, trim, and ambient temperature.
A practical design target is keeping the case below 90°C, while respecting the LED and driver manufacturer’s limits. Improve ventilation where possible, but do not rely on airflow alone. Reduce drive current when the application permits, and choose a driver with suitable thermal protection. Reflective ceiling cavities may also raise local temperatures. Record readings at the hottest point, not near an opening. Repeat the test after dust exposure and prolonged operation. One laboratory test is useful, but field conditions are less forgiving.
Overheating is a common reason recessed LED downlights flicker, dim, or fail early. In many homes, insulation, dust, and loose wiring restrict the air surrounding the fitting. Heat needs somewhere to go. Restore airflow by keeping a clear 75 mm zone around each downlight, unless the installation instructions require a larger space. Never compress insulation against the housing or cover ventilation openings. Even a small blockage can trap warm air above the ceiling.
Turn off the power before inspecting the area, and ask a qualified electrician to check uncertain wiring. Look for yellowed insulation, brittle connectors, or a ceiling that feels unusually warm. These details matter. A thermal protector may prevent immediate damage, but repeated overheating still reduces LED life. Use a ruler to confirm the clearance, rather than guessing by eye. I have found that rushed ceiling work often leaves the gap uneven. That mistake is easy to miss. Building rules and the fitting’s certification should guide the final arrangement, because not every downlight has identical insulation requirements. Keep the space clean, dry, and unobstructed. Ventilation works best when the surrounding ceiling cavity remains open.
Top 10 Ways to Solve Overheating in Recessed LED Downlights
Overheating often begins with a simple mismatch: the LED module draws more power than the housing can safely dissipate. Check the housing label before installation. Confirm its maximum LED wattage, thermal rating, and insulation-contact approval. A 12-watt lamp may look modest, but a compact housing can still trap significant heat above the ceiling.
Measure the actual wattage, not only the advertised brightness. Replacing a 9-watt LED with a 15-watt version can exceed the rated thermal load, especially inside a shallow or tightly insulated cavity. Keep insulation away when the housing requires clearance. Never cover ventilation openings. Heat needs somewhere to go. Also inspect the trim and junction box for dust, loose connections, or crushed wiring. These details can raise temperature and reduce service life.
Use a compatible, lower-wattage LED when the existing housing has limited capacity. If the light output drops too much, replace the housing with one designed for the required load. That may cost more, but repeated failures cost more later. In field checks, temperature problems are sometimes blamed on the LED alone, while poor airflow is the real cause. I have found this assumption too convenient. Verify the fixture label, surrounding insulation, dimmer compatibility, and measured operating temperature. When the installation remains uncertain, ask a qualified electrician to assess the housing and local requirements before energizing the circuit.
| No. | Overheating Solution | Recommended Check or Target | Practical Action | Warning Sign |
|---|---|---|---|---|
| 1 | Match LED wattage to housing capacity | The lamp or LED module wattage must not exceed the housing's listed maximum wattage and rated thermal load. | Check the housing label, installation instructions, and LED module datasheet. Use a lower-wattage module if the available thermal capacity is limited. | The fixture operates above its stated rating, repeatedly shuts down, or shows discoloration around the trim. |
| 2 | Confirm the correct insulation rating | Use an insulation-contact-rated housing where the fixture is installed against or near building insulation. | Verify the housing's IC or equivalent thermal classification before installation. Do not cover a non-IC fixture with insulation unless the instructions specifically permit it. | Insulation, vapor barriers, or loose-fill material directly surrounds a fixture that is not approved for that condition. |
| 3 | Maintain required clearance | Follow the manufacturer's minimum clearance from insulation, joists, ductwork, pipes, and other heat sources. | Keep the housing and driver within the installation clearances shown in the instructions. Never compress insulation against heat-dissipating surfaces. | The fixture is tightly enclosed, installed beside a hot duct, or blocked by framing members. |
| 4 | Improve heat dissipation | Keep the heat sink, housing, and driver exposed to the airflow conditions allowed by the design. | Remove unnecessary obstructions, avoid sealing ventilation paths, and use only approved airtight covers or accessories. | The outer trim becomes unusually hot, or thermal performance improves when the ceiling opening is uncovered. |
| 5 | Check ambient temperature | Compare the actual ceiling or plenum temperature with the fixture's specified operating range. | Measure temperature after the light has operated continuously under normal conditions. Reduce the LED load or improve ventilation where the ambient temperature is above the rated limit. | The fixture overheats only in summer, in poorly ventilated roof spaces, or near heating equipment. |
| 6 | Use a compatible LED driver | Confirm that driver output current, voltage, load range, and temperature rating match the LED module. | Replace mismatched or overloaded drivers with a compatible, approved unit. Keep the driver within its permitted enclosure and temperature conditions. | Flickering, buzzing, premature driver failure, or a driver enclosure that is too hot to handle safely. |
| 7 | Verify dimmer compatibility | The dimmer must be rated for the LED load and compatible with the driver's dimming method. | Use a compatible dimmer and observe the minimum and maximum load requirements. Avoid combining incompatible control systems. | Flicker, audible noise, inconsistent dimming, or increased heat when the light is dimmed. |
| 8 | Reduce unnecessary LED power | Select the lowest wattage that provides the required illuminance, beam angle, and color quality. | Replace an oversized LED module with an efficient lower-wattage option while maintaining the required lighting level. | The space is overlit, the module runs near its maximum output continuously, or energy use is higher than necessary. |
| 9 | Inspect and clean the fixture | Check for dust, paint, debris, damaged heat sinks, loose connections, and blocked ventilation paths. | Turn off power, allow the fixture to cool, and clean it according to the installation instructions. Repair or replace damaged parts. | Dust buildup, darkened components, loose wiring, or declining light output after extended operation. |
| 10 | Measure operating temperature | Compare measured temperatures at the housing and driver with the limits in the product documentation. | Use a calibrated contact probe or thermal imaging equipment after thermal stabilization. Correct the installation if temperatures exceed the specified limits. | Thermal shutdown, shortened LED life, visible color shift, reduced brightness, or repeated circuit-breaker trips. |
| Safety note: Ratings, clearances, operating temperatures, and thermal limits vary by fixture and installation method. Always follow the applicable electrical code and the specific manufacturer's installation instructions. Disconnect power before inspection or servicing. | ||||
Overheating in recessed LED downlights often begins above the ceiling. A warm room can push a 40°C-rated driver beyond its design limit. Use an infrared thermometer after two hours of operation. Check the driver housing, ceiling cavity, and trim temperature.
Inspect the driver label and confirm its ambient rating. Do not cover it with insulation unless the installation instructions permit it. Keep insulation clear of ventilation paths.
Remove dust from the heat sink and check for crushed junction boxes. Tighten loose connections only when power is safely isolated. Also verify the lamp load, wiring condition, and thermal protection.
A driver that flickers, clicks, or smells hot needs careful testing, not guesswork.
Tips: Test the light at full output, then at its usual dimmed level. Some controls create extra heat or cause unstable dimming. Confirm compatibility between the driver, dimmer, sensor, and control system.
Record the ceiling temperature on a hot afternoon. Small details matter. I have seen a cool-looking trim hide a driver that was too hot to touch. That visual check was not enough.
If insulation, airflow, or control settings remain uncertain, ask a qualified lighting professional to assess the installation.
Check the housing label before installation. Match the lamp wattage to its rated thermal capacity. Heat needs somewhere to go.
Not always. A shallow housing may trap extra heat and exceed its thermal load. Measure actual wattage, not brightness alone.
Keep insulation away when clearance is required. Never cover ventilation openings. Inspect dust, crushed wiring, and the junction box.
Run the light for about two hours. Use an infrared thermometer on the driver, trim, and ceiling cavity. Test during a warm afternoon.
Flickering, clicking, or a hot smell needs careful testing. Do not rely on appearance. A cool trim can hide a very hot driver.
Yes, especially when it covers the driver or blocks airflow. Follow the housing instructions and keep ventilation paths clear.
They can create extra heat or unstable dimming. Check compatibility between the driver, dimmer, sensor, and control system.
Use a compatible lower-wattage LED if the housing has limited capacity. If brightness suffers, replace the housing. Repeated failures cost more later.
Isolate power before inspection. Tight connections matter, but uncertain wiring needs a qualified electrician. Guesswork can miss the real problem.
Do not blame the LED automatically. Poor airflow, insulation, controls, or driver placement may be responsible. I have made that assumption too quickly.
Overheating in recessed LED downlights can be controlled through a systematic thermal check. Start by identifying nearby heat sources and measuring the LED junction temperature, ensuring it remains below 125°C during normal operation. Improve the heat sink or thermal pathway so the luminaire case temperature stays under 90°C. Restore airflow around the fixture and preserve a clearance zone of at least 75 mm to prevent heat from becoming trapped above the ceiling.
To understand how to solve overheating in recessed led downlights, also match the LED wattage to the housing’s thermal capacity and never exceed its rated load. Inspect the driver, insulation, and control components, confirming that each is suitable for its 40°C ambient temperature rating. Regular testing, proper installation, clean ventilation paths, and compatible components can significantly reduce heat buildup, extend service life, and support safer, more reliable lighting performance.
