Vactrim Light Vactrim Light

How to Hide Wires for Suspended Linear Lighting?

Time:2026-09-22 Author:Charlotte
0%

Suspended linear lighting can create a clean architectural line, but exposed cables quickly weaken that effect. Learning how to hide wires for suspended linear lighting requires more than pushing conductors above the ceiling. It involves planning the power route, suspension points, junction boxes, and access for future maintenance. The U.S. Department of Energy reports that LED lighting can use at least 75% less energy than incandescent lighting and last up to 25 times longer. That efficiency matters, but a poorly concealed installation can still look unfinished.

The International Energy Agency’s Energy Efficiency 2024 report identifies lighting as responsible for roughly 15% of global electricity consumption. Better lighting design therefore combines visual control with responsible energy use. Richard Kelly, a pioneering architectural lighting designer, stated, “The art of lighting is the art of controlling light.” His principle applies to every cable, canopy, and ceiling penetration. The wire should support the illumination without competing with it.

In practice, installers often use hollow suspension rods, slim aircraft cables, recessed junction boxes, and ceiling-colored raceways. Each method has limits. A painted raceway may disappear from floor level but remain obvious near the fitting. A concealed cable may look elegant but complicate inspection. That trade-off deserves honest attention.

This guide examines practical routing methods, mounting details, and common installation mistakes. It also considers ceiling types, dimming controls, emergency access, and visual alignment. The goal is not to make every wire invisible. The goal is controlled, safe, and maintainable concealment. Sometimes, the cleanest result is not the most hidden one.
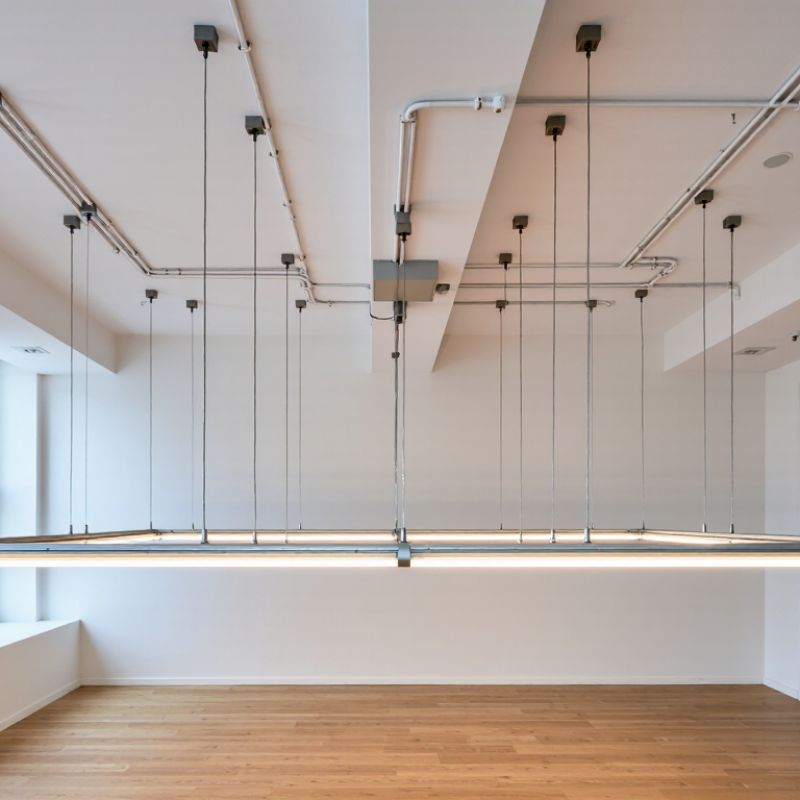
How to Hide Wires for Suspended Linear Lighting?

Understanding Wire-Hiding Options for Suspended Linear Lighting

Hiding wires for suspended linear lighting begins with understanding the ceiling structure. A solid ceiling may allow a shallow junction box and a neat canopy. A suspended ceiling often provides a more flexible route above the panels. Measure the drop before choosing the fixture. Even a small miscalculation can leave visible cable loops.

A hollow suspension stem can conceal conductors from the ceiling to the light body. This creates the cleanest visual line, especially over dining tables or reception desks. Flexible cord can work when the fixture needs adjustable height. However, it should remain straight, supported, and protected from sharp edges. Never pack extra cable inside a crowded canopy. Heat and difficult maintenance can become real problems.

Surface-mounted raceways offer another practical option when opening the ceiling is impossible. Paintable channels can follow a corner or ceiling joint with less disruption. They are not completely invisible, but careful alignment makes them less noticeable. I have found that matching the channel to the ceiling helps more than trying to hide every millimeter. That approach is not perfect. It is often more serviceable.

Before installation, confirm the junction box location, suspension points, and cable length. Leave enough access for future repairs. An experienced electrician should verify connections, load limits, grounding, and local electrical requirements. Photograph the hidden route before closing the ceiling. That small record can save time later, particularly when the lighting layout changes.

How to Hide Wires for Suspended Linear Lighting?

Understanding wire-hiding options helps match the installation method with the ceiling structure, visual requirements, and available space. The chart shows representative midpoint depths from common construction solutions; actual dimensions vary by fixture and installation system.

Key insight: Surface raceways generally require the least depth, while cable trays need more overhead space. Recessed channels and hollow stems offer a cleaner appearance when the ceiling can be modified or when the fixture design supports internal cable routing.

Planning the Ceiling Route and Selecting Suitable Materials

How to Hide Wires for Suspended Linear Lighting?

Suspended linear lighting looks clean only when its ceiling route is planned before installation. On real projects, I mark the fixture centerline, power point, and access path on the reflected ceiling plan. Keep the route as straight as possible, but leave a small service loop above the canopy. That loop prevents a tight cable from pulling against terminals during adjustment. Measure twice. Ceiling structure matters. Joists, ducts, sprinklers, and insulation can force a route change. Do not hide a junction where nobody can inspect it. An electrician should verify load, grounding, and local installation requirements before the ceiling is closed. Plans are useful, but the finished ceiling may still reveal surprises.

Tips: Choose materials for the ceiling type, not appearance alone. Use rated flexible conduit or approved cable protection where wires pass through metal framing. Select clips, anchors, and junction boxes that match the substrate and cable weight. For hollow ceilings, accessible boxes and suitable toggle anchors are often safer than improvised fasteners. Keep low-voltage and mains wiring separated when required by local rules. Label both ends. White sleeves can blend with a pale ceiling, while black sleeves may disappear above a dark finish. Still, color matching is not a substitute for fire and electrical ratings.

Before closing the route, gently move the suspension points and watch for cable tension. If the wire shifts, the support spacing or entry angle needs reconsideration. I prefer a removable cover near the power connection, because hidden faults are difficult to diagnose. Photograph the completed route before plasterboard or panels conceal it. Record measurements from two fixed walls, not from temporary furniture. This seems fussy. Later, it can save hours. One detail is easy to miss: a perfectly hidden wire may leave no practical way to replace it. Design for access, not just a spotless first impression.

How to Hide Wires for Suspended Linear Lighting? – Planning the Ceiling Route and Selecting Suitable Materials

Practical planning reference for routing concealed wiring, coordinating ceiling components, and selecting materials for suspended linear lighting installations.

Planning Dimension Typical Data or Range Recommended Solution Material or Component Installation Notes Key Safety Check
Suspended Fixture Length 1.2–3.0 m per continuous section Aluminum linear housing with suspension kit Confirm suspension points are aligned with the fixture joints and ceiling structure. Verify the total fixture weight against the rated capacity of the support system.
Ceiling Route Planning Direct route from the junction box to the nearest suspension canopy Concealed conduit or cable pathway above the ceiling Mark the route before closing the ceiling and coordinate it with HVAC, sprinklers, and structural members. Maintain separation from hot surfaces, moving equipment, and services that may cause interference.
Power Feed Location Centered above the fixture or positioned within the manufacturer’s specified feed zone Accessible junction box with cover Leave enough slack for final fixture alignment without creating a visible cable loop. Junction boxes should remain accessible for inspection and maintenance.
Conduit for Concealed Wiring Common internal diameters: 16–25 mm, depending on conductor count and cable size Flame-retardant electrical conduit Avoid overfilling; provide smooth bends and secure the conduit at regular intervals. Use a conduit type permitted by local electrical regulations for the ceiling environment.
Cable Selection Two-conductor cable for basic non-dimmable circuits; three or more conductors for control systems Fire-rated or low-smoke cable where required by the building specification Do not mix power and low-voltage control conductors in the same pathway unless permitted by code. Confirm voltage, current rating, grounding, and insulation temperature rating.
Typical Conductor Size 1.5 mm² copper is commonly used for many lighting branch circuits, subject to local code Copper conductors with suitable insulation Long routes or grouped cables may require a larger conductor size than a short individual run. Final sizing must be confirmed by a qualified electrical professional and local regulations.
Voltage Drop Planning Keep within the limit specified by the applicable electrical standard; 3% is a common design target for lighting branch circuits Correctly sized copper cable and secure terminals Consider the complete one-way and return circuit path when calculating voltage drop. Excessive voltage drop can cause reduced light output, flicker, or driver malfunction.
Dimming or Control Wiring Separate control pair or dedicated low-voltage cable, depending on the control method Dedicated control cable in a separate pathway where required Keep control routes neat and avoid sharp bends near the canopy or driver enclosure. Confirm compatibility between the dimming method, driver, control device, and wiring system.
Driver Location Above the ceiling, inside an accessible enclosure, or integrated into the fixture Metal or flame-retardant enclosure with ventilation clearance Do not bury a driver permanently behind finished surfaces unless it is specifically approved for that installation. Follow the driver’s required clearance, temperature, and access conditions.
Cable Exit at Canopy Centered exit or concealed exit through the canopy top plate Metal canopy, insulating bushing, and strain-relief fitting Ensure the cable does not rub against a sharp metal edge during installation or adjustment. Protect insulation from abrasion and maintain the required earth continuity for conductive parts.
Ceiling Structure Concrete slab, timber framing, exposed steel, or suspended ceiling grid Approved anchors, threaded rods, brackets, or structural clamps Locate structural members before drilling and avoid damaging concealed utilities. Use fixing hardware rated for the combined fixture, cable, and accessory load.
Suspension Cable Management Parallel suspension wires with adjustable length Adjustable suspension cable, clips, and cable retainers Keep electrical cables from carrying the mechanical weight of the fixture unless specifically approved. Provide independent mechanical support and strain relief for electrical connections.
Route Bend Radius Follow the cable or conduit manufacturer’s minimum bend radius; avoid tight 90-degree bends Long-radius elbows or flexible conduit sections Tight bends can damage insulation and make future replacement difficult. Inspect the cable sheath for compression, cuts, or deformation after pulling.
Fire and Smoke Requirements Requirements vary by occupancy, ceiling type, and local building regulations Fire-rated cable, firestop material, and approved penetration seals Seal penetrations through fire-rated walls or slabs using compatible firestop systems. Do not compromise fire compartments or cover sprinkler coverage with the fixture.
Access for Maintenance Provide access to junction boxes, drivers, connectors, and control equipment Access panel, removable canopy, and labeled junction enclosure Document cable routes and leave service loops only where they can be safely contained. Isolate power before servicing and verify the circuit is de-energized.
Pre-Closure Inspection Complete before drywall, plasterboard, or ceiling tiles are permanently installed Cable labels, route drawings, test meter, and inspection checklist Record junction box locations, driver positions, conduit sizes, and spare capacity. Arrange inspection or approval where required before concealing the installation.
Final Alignment Fixture level tolerance commonly targeted at approximately ±3 mm over a short section Adjustable suspension hardware and concealed canopy cover Check alignment from multiple viewpoints and ensure no cable is visible above the canopy. Confirm all mechanical fasteners, electrical terminals, and strain-relief points are secure.
Note: Cable sizes, protection methods, fire requirements, voltage-drop limits, and fixing methods must be verified against the applicable local electrical and building codes.

Preparing the Ceiling, Fixture, and Electrical Connection Points

How to Hide Wires for Suspended Linear Lighting?

Preparing the ceiling correctly makes suspended linear lighting look intentional, not improvised. Mark the fixture centerline before cutting or drilling. Then locate joists, ceiling channels, and existing electrical routes. A laser level helps prevent small alignment errors from becoming obvious across a long fixture. Keep power cables separate from suspension wires where the design allows. Never bury a junction connection above a sealed ceiling. It needs accessible maintenance space. The 2023 NFPA 70, Article 410, addresses luminaire support and electrical connections, but local requirements may differ. A qualified electrician should confirm the installation method.

Use a listed junction box with suitable support, strain relief, and an approved cover. The ceiling structure must carry the fixture, not the decorative canopy alone. For heavier systems, add blocking before closing the ceiling. Leave a clean cable path from the box to the canopy, with only the necessary drop exposed. A small access panel can prevent major repairs later. It may feel unnecessary. It often is not.

The International Energy Agency’s Energy Efficiency 2023 report identifies lighting as roughly 15% of global electricity consumption. Efficient equipment matters, but poor installation can still create glare, heat, and maintenance problems. Check the manufacturer’s wiring diagram, conductor size, dimming compatibility, and required clearances before energizing. I have seen beautiful ceilings fail because the box was misplaced by two inches. Measure twice. Then inspect every connection before hiding it.

Installing and Concealing Wires Step by Step

Suspended linear lighting looks clean only when its wiring is planned early. The U.S. Energy Information Administration’s 2018 CBECS reports that lighting uses about 17% of commercial electricity. Good installation therefore supports both appearance and energy control.

Switch off the circuit at the panel, then verify it with a voltage tester. Mark the ceiling outlet, suspension points, and the cable route. Leave enough wire for height adjustment, but avoid loose loops above the fixture. Feed approved cable through the canopy, strain relief, and suspension hardware. Make each connection inside an accessible junction box. Never bury a splice inside plaster or insulation. Follow local electrical codes, and use a qualified electrician when circuit changes are required. I once allowed too little slack; the fixture hung correctly, but later maintenance became awkward.

Tips: Keep wires parallel with the suspension rods. Use matching clips or listed raceway for exposed sections. Photograph every connection before closing the canopy. Check that no cable touches sharp metal edges. The National Fire Protection Association’s electrical safety guidance emphasizes secure connections, proper enclosures, and protection from physical damage. A final tug test helps, though it does not replace electrical testing. Small details matter.

Inspecting, Testing, and Maintaining the Finished Installation

After a suspended linear light is installed, inspect every visible and hidden cable route. Look for sharp bends, loose clips, exposed insulation, and unsupported wire near the ceiling canopy. The suspension points should carry the fixture’s weight, while electrical cables remain free from mechanical strain. I once found a cable slightly pinched inside a canopy. It still worked, but the damage could have worsened over time.

Switch off the circuit before opening any enclosure. A qualified electrician should verify isolation with an approved voltage tester, not rely on the wall switch alone. Check conductor connections, earth continuity, polarity, and terminal tightness. Test the light at full output, reduced output, and any control setting. Watch for flickering, delayed starts, buzzing, unusual heat, or uneven brightness. These details often reveal faults that a quick visual check misses.

Inspect the finished installation again after several hours of operation. Touch the fixture housing carefully after isolation, checking for abnormal heat or discoloration. Confirm that cable entries still have proper strain relief and that no wire has shifted above the diffuser. Record test results, circuit identification, and installation dates for future maintenance. Dust the fixture with a soft, dry cloth, avoiding pressure on the suspension cables. My own maintenance notes were once incomplete, which made troubleshooting slower than necessary. A simple inspection log prevents that mistake from repeating.

FAQS

How should I prepare the ceiling for suspended linear lighting?

Mark the fixture centerline and suspension points before drilling. A laser level helps keep a long fixture straight. Locate joists, channels, and existing cables. The ceiling structure must support the fixture. Do not rely on the decorative canopy alone.

Where should the electrical connection be placed?

Place a listed junction box near the canopy and keep it accessible. Leave a clean cable path with only the needed drop exposed. Never hide a splice above a sealed ceiling. A small access panel may prevent expensive repairs later. It can feel unnecessary. It often is not.

How can I conceal wires neatly?

Plan the cable route before closing the ceiling. Keep wires parallel with suspension rods when possible. Use matching clips or approved raceway for exposed sections. Avoid loose loops above the fixture. Keep cables away from sharp metal edges.

What should I check before making electrical connections?

Switch off the circuit at the panel and verify isolation with a voltage tester. Do not rely on the wall switch alone. Check the wiring diagram, conductor size, dimming compatibility, and required clearances. Circuit changes should be handled by a qualified electrician. Small wiring assumptions can become serious problems.

How much cable slack should I leave?

Leave enough slack for height adjustment and future maintenance. Avoid large loops above the canopy. Feed the cable through proper strain relief. Too little slack can make later repairs awkward. I have made that mistake.

How should I test the completed installation?

Inspect every visible and hidden cable route. Look for loose clips, sharp bends, exposed insulation, and pinched wires. Check earth continuity, polarity, terminal tightness, and cable support. Test full output, reduced output, and control settings. Watch for flickering, buzzing, delayed starts, or uneven brightness.

What signs suggest a wiring or fixture problem?

Unusual heat, discoloration, flickering, or buzzing may indicate a fault. A cable touching metal can suffer gradual damage. A fixture that still works may not be safe. Switch off power before opening any enclosure. Ask a qualified electrician to investigate uncertain conditions.

How should suspended linear lighting be maintained?

Inspect the installation after several hours of operation and during routine maintenance. Confirm that suspension points carry the weight. Electrical cables should remain free from mechanical strain. Clean the fixture with a soft, dry cloth. Record inspection dates, circuit details, and test results. My notes were once incomplete. Troubleshooting took longer.

Conclusion

This guide explains how to hide wires for suspended linear lighting in a clean, safe, and professional way. It begins by comparing practical wire-hiding options, such as ceiling channels, protective conduits, recessed pathways, and carefully positioned covers. Proper planning is essential: map the ceiling route, measure the suspension points, choose suitable materials, and make sure the wiring path supports both appearance and accessibility.

The installation process includes preparing the ceiling, fixture, and electrical connection points before routing and securing the wires step by step. Wires should be protected from strain, kept organized, and concealed without creating sharp bends or obstructing other ceiling components. After installation, inspect every connection, confirm that the fixture is securely supported, and test the lighting system for stable operation. Regular checks can help identify loose fittings, damaged insulation, or visible wiring early, ensuring the finished installation remains neat, reliable, and easy to maintain.

Charlotte

Charlotte

Charlotte is a seasoned marketing professional with a deep understanding of the company's portfolio and a passion for elevating its presence in the market. With a keen eye for detail and a commitment to excellence, she ensures that our professional blog is regularly updated with insightful articles......